Monday, November 13, 2017


Friday, November 10, 2017
Thursday, October 19, 2017
Tuesday, August 29, 2017
Saturday, August 26, 2017
Friday, August 25, 2017
Wednesday, August 2, 2017
Tuesday, July 11, 2017
How to create transparent cloth efffect usign adobe photoshop
It is a simple photoshop tutorial to create this effect..

Monday, June 26, 2017
Thursday, June 1, 2017
Thursday, February 23, 2017
Tuesday, February 21, 2017
Friday, January 20, 2017
8. Adobe Photoshop CS4 CS5 polka dot effect.

Step 1: Create a new document of size width 10px and height 10 PX. Resolution of 72 PX . This is the basic of our polka dot for our effect that we are going to applied .

STEP 2:- use the zoom tool to zoom out the new document that make you to view this image.

Step 3:- Use the Marque tool and select the circular shape to draw a circle shape.press shift key while drawing the circle this will help to draw a perfect circle otherwise it will looks like a ellipse

Step4:- fill this circle with black colour and press cntrl +I to invert the Color .
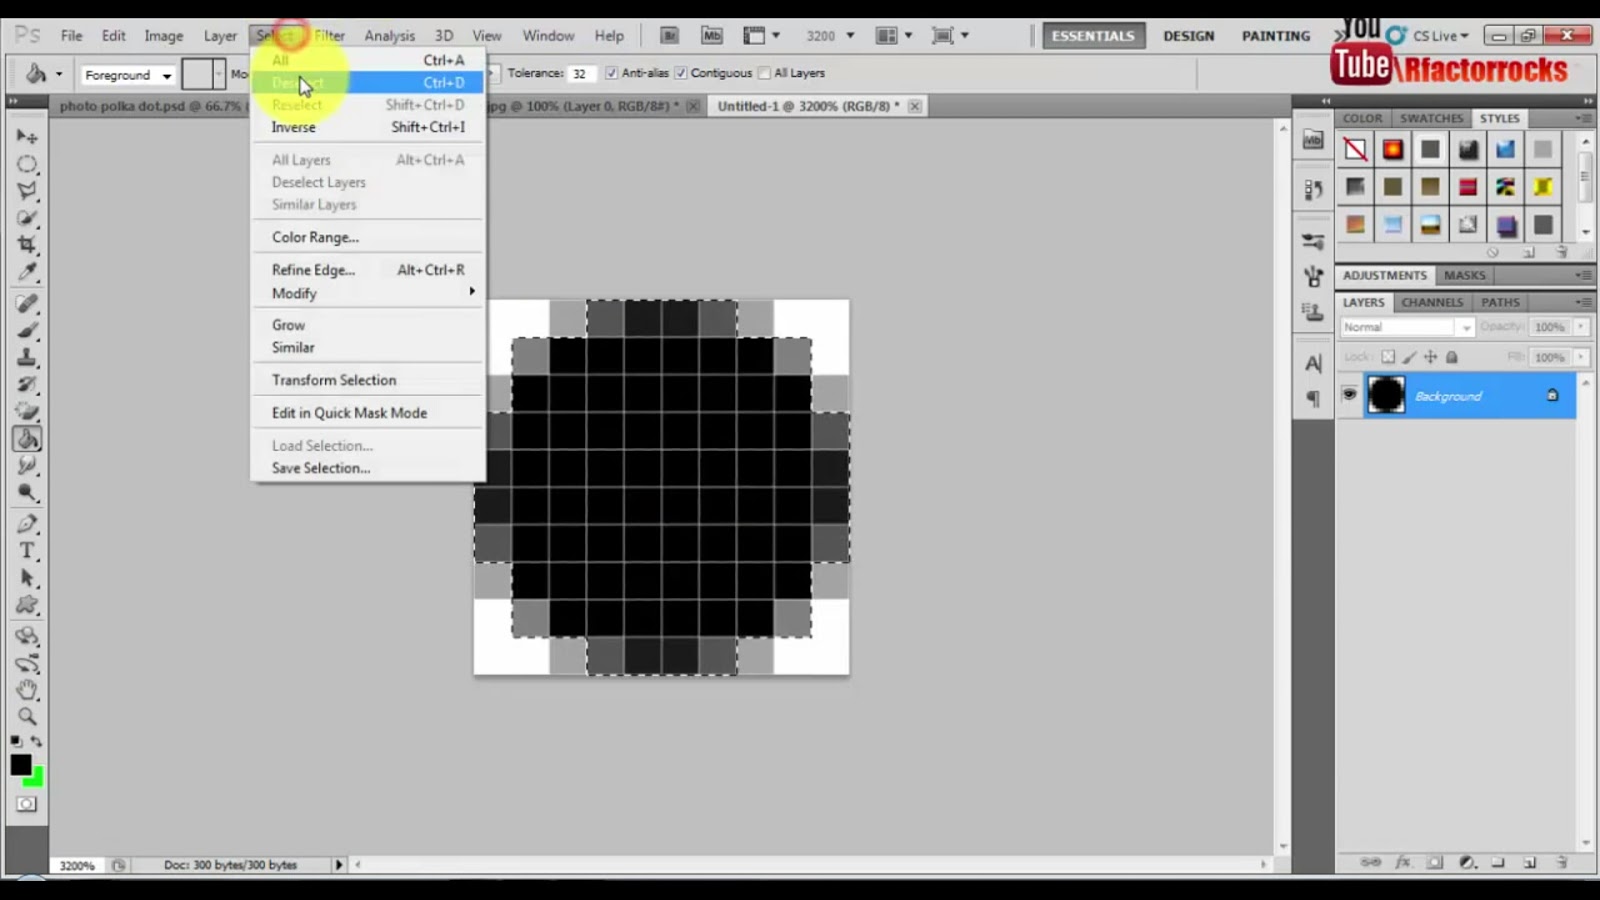

Step 5:- go to EDIT-> DEFINE PATTERN. Name the pattern as polka dot pattern. Naming will help you to identify the same afterward
Step6:- you are done with part 1
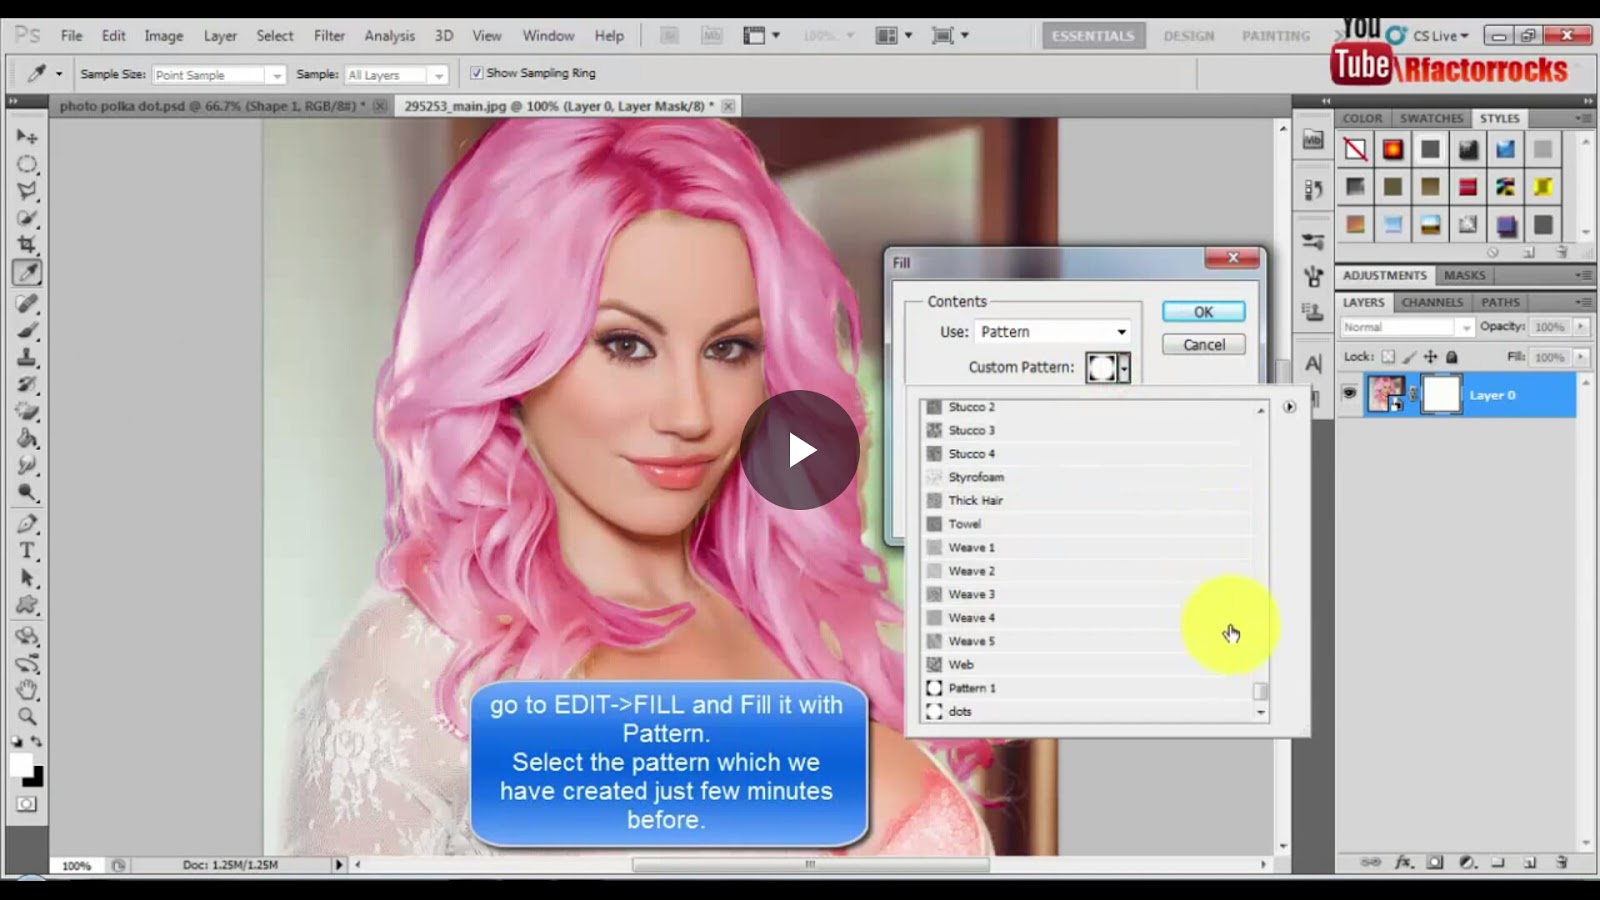
Step7:- Now go back to original image on which you are going to apply the effect.

STEP 8:- right click on image and convert this into smart object.

STEP 10:- now go to Edit -> fill
Content
Use pattern
Custom pattern polka dot pattern
Fill the mask layer with polka dot pattern.this pattern was created by us in part 1.
STEP 11:- Now you are done with polka dot pattern . The image after applying the polka dot pattern will look like this.

You are done with this tutorial . Now you can also follow my YouTube tutorial for more details .
Friday, January 13, 2017
6. Adobe photoshop Cs4 Cs5 fire text effect.

Tutorial no :-6 In this tutorial we are going to create fire text effect using some of basic tools of Photoshop
STEP 2:- create a new blank document of size 1250x800 pixel.
Set the resolution to 72 pixel.

STEP 3:- create a new blank layer above this background layer and fill it with black colour .

STEP 4:-create a text layer above these layer..I am using these in my tutorial
Font type impact
Size 100px

STEP 5:- we will be going to rotate this text anticlockwise. Before rotating this text. We have to raster this layer.right click on layer and select rasterize this layer.
After applying raster tool
Go to EDIT-> TRANSFORM->ROTATE 90CCW

STEP 6:- go to FILTER -> STYLISH -> WIND.
Fill these values in the box
Methods:- wind
Directions:- from right.

STEP7:- apply the same effect 3 times . After applying these 3 times the image will look like this.
Then go to EDIT -> TRANSFORM-> TRANSFORM CW.

STEP 8:- GO TO FILTER-> BLUR -> GAUSSIAN BLUR
Apply radius of blur :- 6.
. After applying Gaussian blur ur image will gives a smoking effect . That will reduces the roughy edges that come after applying the wind filter.

STEP 9:- create a new blank layer above all these layers.we will be pasting the text in this layer .
Now I to IMAGE -> APPLY IMAGE
Click OK .

STEP 10:- PRESS CNTRL +U to open HUE . This will color the layer into fiery text.fill these values to color the layer .
Check colorize
Saturation-> 100
Hue -> 40


STEP 11:- Duplicate this layer..Selecting the duplicate layer open again HUE (Cntrl +U). This time do not use colorize
Fill these values
Hue =-40.

to follow this tutorial visit the youtube channel
Tuesday, January 10, 2017
4. Adobe photoshop rainbow eyes effect rfactorrocks

Tutorial no:-4 In this tutorial we are going to create a rainbow eye effect using Adobe Photoshop. This is a simple tutorial with basic filters and tools.
Step 1:- In this open an image of eye . Use clean full HD image with high resolution. More clear the image more stunning the effect.

Step 2:+ Create a new blank layer above this background image.
Step 3:- select a brush tool round brush tool with size of 27. Or you can adjust the size of brush accordingly.
Step 4:- Now we will start painting the layer with the purple color (#af03ff). Make a clear round purple dot on the eye. The image will look like this.

Step 5:- again go to color palette and select a lighter version of purple color. Paint it on the eye as shown below.

Step 6:- Repeat the same step again and again for the VIBGYOR. paint the whole eye with these color. The image after applying correct values of color will look like this.


Step7:- go to Filter-> Blur>GAUSSIAN BLUR.
And apply it . Use radius that will merge all the Color with no edges.


Step8:- After applying the blur filter. use soft eraser tool and erase the portion which goes outside the iris of eye. Now you are done with this.
Final image will look like this.

For video tutorial please follow my YouTube channel
.
Monday, January 9, 2017
5.Adobe photoshop how to create a wedding photoframe
Tutorial no .5
In this tutorial we are going to create a wedding photo frame using basic photoshop halftone effect.

Step 1:- Select a background image prefer the image that contains bridal image. For reference you can use the image that is provided below

Step:2 create a new blank layer above this background layer. Fill this blank layer with white color. Select the white color from color palette after filling and layer with white color the layer will look like this.

Step 3:- After applying fill tool the image will look like below

Step 4:- select the marque tool (rectangular tool). Draw a rectangle over the white surface and leave some space. This space will add effect more the space more will be halftone effect.

Step5:-select the black colour from the Color palette. Fill the inner layer with the black colour.the image will look like this.

Step 6:- Right click on the layer 1 and select convert to smart object. This will make the layer as object to apply effect on it

Step7:- Go to filter-> apply Gaussian Blur filter with the value of 18. After applying the layer with blur filter. Image look like this.

Step8:- Go to filter -> pixelated->color halftone.
Fill these values
Radius :- 12
Chanel 1:- 45
Chanel 2:- 45
Chanel 3:- 45
Chanel 4:- 45
After applying correct values to the filter. The image will be like this.


Step 9:- Now go to layer and apply screen on it this will reveal the background image over the black area of the layer 1. Finally your image look like this .
Step 10:- create a new text layer above all of the layers. Type happily married over this and select any bright color to suits the effect.

Thank you for reading
You can watch YouTube video in the link which is provided below .
Subscribe to:
Comments (Atom)